Showing posts with label NetBeans. Show all posts

Monday, May 1, 2017

Adding an Exit Dialog to your NetBeans Platform based RCP

Over time numerous requests to add an Exit Dialog box accumulated in my list of requested enhancements. I have always thought about where to hook up such a Dialog and after reading through the NetBeans Wiki I realized the ModuleInstaller class is a good candidate (rather than using the LifeCycleManager).

The DevFaqModulesStartupActions is mentioning the closing() method of each ModuleInstaller of each module has VETO rights to prevent the application from exiting.

So adding an instance of a ModuleInstaller in one of your modules of your RCP as described in the above DevFaqModulesStartupActions Wiki entry and overriding the closing() method with code asking the user if it is OK to exit in a modal dialog. If not, return false and VETO the exit sequence. My code turned out to look like below:


Thursday, April 27, 2017

Set InitalMainWindowSize and location of numerous TopComponents

The NetBeans Wiki about DevFaqInitalMainWindowSize already gives an initial hint of how to control the size of your TopComponent at startup.What was missing for me was: How to place 2 (or more) TopComponents (both being of type "editor") next to each other ?

I will show the answer to this in a test  RCP in painful detailed steps to avoid any misunderstandings.

Assume we have a NetBeans Platform application with name PreDefineSize having two modules with names module1 holding the LeftTopComponent and a module2 holding the RightTopComponent.


Performing a Clean and Build and run will give


Assume that we would like the application at startup with both TopComponents next to each other with about 75% to the Left and 25% of the horizontal space to the Right module. I.e. Something like:

How to achieve this ?


1) After you have resized and placed the 2 TopComponents as you want, Click the LEFT module tab (just to make it the last active) and then exit the application.
2) Go to  PreDefineSize/build/testuserdir/config/Windows2Local
3) Copy the WindowManager.wswmgr to the src directory of module1


 4) Go to PreDefineSize/build/testuserdir/config/Windows2Local/Modes
5) Copy the editor.wsmode to the src directory of module1 and rename to editorWsmode.xml
6) Copy the anonymousMode_1.wsmode to the src directory of module1 and rename to editorRightWsmode.xml
7) Go to PreDefineSize/build/testuserdir/config/Windows2Local/Modes/anonymousMode_1
8) Copy the RightTopComponent.wstcref to the src directory of module1

9) Modify the editorRightWsmode.xml file and the value of the "unique" attribute to editorRight


Note :  In line 8 you might see that the "number" attribute is controlling the order.

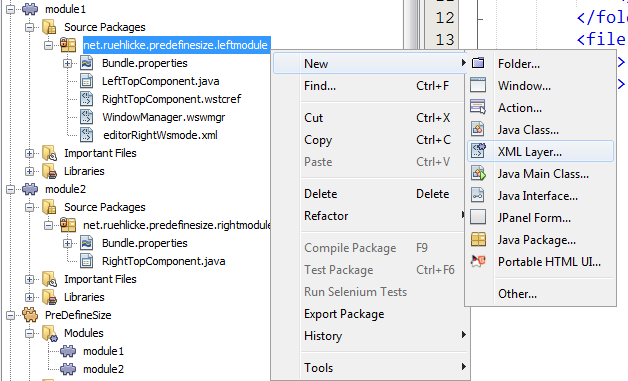
10) Create the XML layer file in module1 like below


11) From the tree above open the module1- Important Files - XML Layer .... Modes

12) Create a new folder called editorRight


13) Edit the layer.xml in the src directory of module1 file like below


14) Now do a Clean and Build and the application will start with the layout and size you decided in Step 1


Here is the entire test NetBeans project :   PreDefineSize NB Project ZIP

Thursday, March 23, 2017

Keep Aspect Ratio of a JFXPanel embedded in a NetBeans TopComponent when resizing

Following the strategies outlined in the book "JavaFX Rich Client Programming on the NetBeans Platform" by Gail and Paul Anderson (Amazon reference) I still had trouble keeping a circle a circle after users decide to resize the TopComponent.

The FX Scene is using a StackPanel and on top of that Panels for different drawings. The ScatterChart sits on top of the StackPanel and causing a circle to become oval when the user reduces the width or height of the TopComponent.

Challenge is show below :


And what really should happen when like above the user fx reduces the width, is:

Like with the Egg of Columbus the solution is quite simple. Though you have to remember that the controller is executing in the FX Thread and the TopComponent on the Swing Event Thread.

In the TopComponent containing the JFXPanel, add the following to the componentOpened() method:


The "controller" object is the class (as described in the book mentioned above) and is executing on the FX Thread. The method with the long name is doing nothing else than setting the Pref size of the StackPane and the ScatterChart in the controller class like:


If any of you have a better way - drop a comment. The above at least made it work for me.


Saturday, May 12, 2012

NetBeans build on a SSD

After 4 1/2 years it was time to send my old laptop into retirement. A replacement laptop with a 512 Gig SSD Samsung PM830 did the trick. Old laptop was freshly defragmented XP 32 bit 2 gig ram dual core 2.2 GHz cpu. New had Win 7 64 bit, 16 gig, 512 SSD quad core i7 2.5 GHz.

Building my system both with a 32 bit JDK with ProGuard obfuscating turned on "Clean and Build all":
OLD system: 4' 25 sec
NEW system: 1' 29 sec

Launching NetBeans (6.5) with around 50 modules:
OLD system: 25 sec
NEW system: 8 sec

In general a 3x increase in speed ! I strongly believe the disk I/O is the major consumption of time here. CPU and Memory is only contributing minor.

Wednesday, December 7, 2011

Multiline ToolTips

Funny, never thought about it, but when using a ToolTip with NbBundle.getMessage and a property in the Bundle.properties it is of course possible to make a multipline ToolTip by using the <html> HTML tag. An two line example would be:

LBL_DeltaX_ToolTip=<html>Change in x direction in mm.<\br>Some other second line text</html>

Have this as ONE line in the Bundle.properties file.

Saturday, December 3, 2011

Access currentVersion

The currentVersion property is used to for example show the version number of your RCP in the Title line. Now it can be set via branding 
${basedir}/branding/core/core.jar/org/netbeans/core/startup/Bundle.properties Nothing new here. The trick is if this holds information you would like to retrieve at runtime.


Naively one could try NbBundle.getMessage(Main.class, "currentVersion"); which will fail. 

I have found a way around which may not be the most obvious path - but at least a solution which might help others. I had to work around it by copying the content of that property to a Bundle.properties file which is within my access space. I do this via Ant when building the app each time. Example:

In the main build.xml add a target 
<target name="build-brand" depends="-init">
<propertyfile file="${basedir}/../moduleA/com/mycode/xyz/Bundle.properties" comment="Updated by build script for full version info">
<entry key="fullVersion" value="${app.version}" />
</propertyfile>
</target>


The target above will create a property in the Bundle.properties file in the package
/com/mycode/xyz of moduleA You could here instead of using ${app.version} use ant command to read the currentVersion property if already set. If it is in your control you can of course set the currentVersion automatically as well like adding the following into the same ant target. ${build.number} and $(app.comment} are my own properties - but you get the point.
<propertyfile file="${basedir}/branding/core/core.jar/org/netbeans/core/startup/Bundle.properties" comment="Updated by build script">
<entry key="key="currentVersion" " value="${app.title} ${app.version}.${build.number} ${app.comment}" />
</propertyfile>


If you do this first you can set the "fullVersion" (or whatever you would like to call it) property to the moduleA/com/mycode/xyz package and a method like

    public String getFullSoftwareVersion() {
        // This value is stored in the Bundle.properties of this package
        return NbBundle.getMessage(MyClassXyz.class, "fullVersion");
    }


 As this is within your code you can now read the value.

Saturday, January 15, 2011

VisualLibray Z-order problem for ComponentWidget

For too long I had a problem with the Z-ordering of ComponentWidget's in VisualLibary.

As a reference it was fixed in NetBeans 6.8 (see http://netbeans.org/bugzilla/show_bug.cgi?id=169373 and the fix source in http://hg.netbeans.org/main-golden/rev/da7547f37f44).

As I am still in NetBeans 6.5 the solution was simply the use the 6.8 jar of the org-netbeans-api-visual.jar and replace the one in your Nb 6.5 install under platform9/modules.

Note that you CANNOT use the version from 6.9 or later due to some major refactoring of modules (like the Lookup got its own module).

This now works perfect.

Monday, May 3, 2010

Testing NBM's for update center locally

When creating NBM's to be deployed for an update center NetBean's nicely create a list of NBM's and the corresponding update.xml file.

Now, when you would like to test those NBM's I often upload to a dev-area on my webserver to test the update. A faster way to check the consistency of the generated files is directly to enter a File URL in the the Settings for the Update Center.

An example of the syntax to use to read those update from a local Windows disk:

file:/C:/svn/trunk/myapp/build/updates/update.xml

Friday, February 26, 2010

As I was trying to launch a NetBeans RCP app from an external drive with a specific JRE also deployed on that external drive, I had a little trouble to also have the user directory located there.

My mistake was to have the user directory specified in the same directory as the RCP app.

Example: Assume you create a ZIP of your app called "MyApp". It will be in a folder called "MyApp" (The folder is containing "bin", "etc", and so on). To make sure it uises a given tested version of the JRE assume you also have a copy of the JRE in that deployment dir.

NOT WORKING :

set MYAPP=%~dp0
"%MYAPP%\bin\myapp.exe" --jdkhome "%MYAPP%\jre6" --userdir "%MYAPP%\myuserdir"


The code above will create the userdir but than just exit. I have no explanation for this behavior. What solved the problem is to make sure the user directory is not under the deployment directory

WORKING:

set MYAPP=%~dp0
"%MYAPP%\bin\myapp.exe" --jdkhome "%MYAPP%\jre6" --userdir "%MYAPP%\..\myuserdir"


Which put the user directory parallel to the deployment directory.

Wednesday, January 27, 2010

Oracle is going full speed NetBeans

From this link (Ted Farrell, Chief Architect and Senior Vice President about Oracle + Sun Java Developer Tools Strategy) I can only positively conclude that Oracle is putting its eggs into NetBeans - including the NetBeans Platform - Great news !

Thursday, November 12, 2009

Missing rt.jar Mac OS X using ProGuard with NetBeans

When you are using ProGuard for obfuscation of some of your NetBeans module code on a Mac running OS X and you will most likely refer to rt.jar in your build.xml and get and error about missing rt.jar.

One quick fix solving this could be the following which helped me.

On your Mac open a terminal and change directory to

/System/Library/Frameworks/JavaVM.framework/Versions/1.6.0/Home/lib


now just softlink to classes.jar via

me$ sudo ln -s ../../Classes/classes.jar rt.jar

Tuesday, November 10, 2009

Visual Library Website moved

After the migration of all NetBeans sites we now have

http://graph.netbeans.org is now http://platform.netbeans.org/graph

Tuesday, October 20, 2009

Visual Lib and Widget Locations after resize

After a longer (rather frustrating) debugging I have found a way to fix what is mentioned under http://www.netbeans.org/issues/show_bug.cgi?id=173997 (see at the end of this issue a test app)

The key to success here is to ignore whatever is returned by the widget.getPreferredLocation() and only focus using the widget.getPreferredBounds().

As David (father of Visual Lib) nicely reminded me about we have the view/scene/local coordinates are described at:

http://bits.netbeans.org/dev/javadoc/org-netbeans-api-visual/org/netbeans/api/visual/widget/doc-files/documentation.html#CoordinationSystem

but even though the coordinates are getting somehow mixed up and the only safe way is to ask for the getPreferredBounds() and than convert those to the Scene coordinate system.


Friday, September 25, 2009

Dynamically change color of Node icon(2)

I blogged about the way to change the color of an icon dynamically here. Now, I have encountered that when I add those icons to a list of nodes or menu items, all icons get the color of the last one changed. Hmpf.

It looks like that ImageUtilities.loadImage(..) somehow caches the icon and hence even when assuming working on a new copy we still work on the common one.

The way I got it working was to forcefully create a new BufferedImage and merge in the one just loaded. The new code looks like this


private BufferedImage icon16;
private BufferedImage icon32;
public static final String PROP_ID = "id";
public static final String PROP_NAME = "displayName";
public static final String PROP_COMMENT = "comment";
public static final String PROP_COLOR = "color";
public static final String PROP_ICON16 = "icon16";
public static final String PROP_ICON32 = "icon32";

// ...

public Image getSmallImage() {
int width = icon16.getWidth();
int height = icon16.getHeight();

BufferedImage newImage = new BufferedImage(width,height,BufferedImage.TYPE_4BYTE_ABGR);
newImage = (BufferedImage)ImageUtilities.mergeImages(icon16, newImage, 0, 0);

for (int x = 0; x < width; x++) {
for (int y = 0; y < height; y++) {
int rgb = newImage.getRGB(x, y);
if (newImage.getRGB(x, y) < 0) {
rgb = some_method_returning_the_RGB_for_a_selected_color;
newImage.setRGB(x, y, rgb);
}
}
}
return newImage;
}

// ...

private void loadIcons() {
String iconId = props.getProperty(PROP_ICON16);
icon16 = (BufferedImage)ImageUtilities.loadImage(iconId);
iconId = props.getProperty(PROP_ICON32);
icon32 = (BufferedImage)ImageUtilities.loadImage(iconId);
}


And it now respects each individual color.

Friday, September 18, 2009

Update build zip distribution with additional files

Inspired by a discussion on the NetBeans Developer Forum, (dev@openide.netbeans.org), and seen multiple struggeling with this, I would like to capture how to add some files or directories to the ZIP distro file on build

Suppose you have a directory in your sandbox you would like to add to the distro. This could be source code from an OpenSource project you have edited and hence have to make public, or some other directories. You may already have choosen to add the target build-launchers to copy those to the build directory like:

<target name="build-launchers" depends="suite.build-launchers">
<copy todir="${build.launcher.dir}">
<fileset dir="MyExtraDirectory"/>
</copy>
</target>

You can hereafter add the target which will add this directory to the zip file build simply by leveraging ant commands


<!-- Customized build-zip target to copy reports to the distribution -->
<target name="build-zip" depends=quot;suite.build-zip">
<!-- Update the just created ZIP with additional directories/data -->
<echo message="Adding MyExtraDirectory ..."/>
<zip destfile="${dist.dir}/${app.name}.zip" update="true">
<zipfileset dir="${build.launcher.dir}/MyExtraDirectory/" prefix="${app.name}/MyExtraDirectory"/>
</zip>
</target>


Done.

Thursday, September 10, 2009

Clipping with Visual Library

For a while I had trouble with clipping but I never gave it the attention needed to figure it out. Now I really needed it and here my findings.

I had a Scene on top I was drawing a Rectangle represented in a Widget using resizeable Border, sitting in a LayerWidget on the Scene.

I wanted
A) The Scene not to extend into the negative numbers when the user dragged the Rectangle to the left (over the x=0 line)
B) The Rectangle to be clipped when exiting to the left
C) The Rectangle to be clipped when exiting to the right border of the Scene

The solution is

scene.setMaximumBounds(new Rectangle(0,0,width,height));
scene.setMaximumSize(new Dimension(width,height));
scene.validate();
scene.setCheckClipping(true);

In addition you have to set clipping on the LayerWidget holding the Widget representing the Rectangular

myLayerWidget.setCheckClipping(true);

This last line makes sure that the rectangle is still partly visible when it gets dragged over the edges of the defined scene size. If you would omit this last setting, the rectangle would be clipped in its total when outside the edge of the scene and you do not get the partly clipped image.

Wednesday, September 2, 2009

Property Sheet Props not visual updating

I just run into an issue which was discussed a couple of month ago here on the NetBeans Dev mailing list. (see here)

Now, assuming we have the scenario of the MyBean as model as shown as an example in Wade Chandlers first answer. Now also assume you have a MyBeanNode which is representing this data.

Also assume you have the MyBeanNode listening to PropertyChanges to MyBean via some line like

myBean.addPropertyChangeListener(WeakListeners.
propertyChange(this, myBean));


The propertyChange(...) method in MyBeanNode will do needed updates to the model etc.

So far so good.

Now I was tempted to add the option to allow to Rename the object.

1) I added canRename() to the MyBeanNode and let it return true.
2) I added the Action[] getActions(..) method and made sure to add the SystemAction.get(RenameAction.class)
3) I added the setName(..) method

Happy a Rename popup was available and when I rename the object the Node name was changed - but - the name field in the Property Window was still showing the old value. Even though when doing some refreshing action like collapsing and expanding the property Sheet Set it was showing the correct value.

Hmpf - very similar to the problem the person in the discussion encountered.

Now .. the solution is to add the following line to the setName(String name) method of your MyBeanNode

this.firePropertyChange("name", oldname, newname)

Note, this is fire'ring a property change event to all listening to changes in the Node - while the pcs.firePropertyChange(...) call in the MyBean was sending it to its listeners - which was the MyBeanNode in this case.

Without knowing I assume that the PropertySheet's GUI is listening to PropertyChanges in the Node ? Well - anyhow - this solved my problem and the problem discussed in the link above.

Wednesday, August 26, 2009

Dynamically change color of Node icon

While working and extending my Palette usage I had the challenge of having 6 categories and each of those an undefined number of items. Each of the items in each category had the same icon.

Now, using 6 different 16x16 and 32x32 pixel icons I suddenly got confronted with the requirement of each of those icons should be able to represent in the standard 16 web colors.

Well, it was out of the question to add 16*(6+6) = 192 different png based icons for those different options.

Using the example of created a Palette described in the "Rich Client Programming" book I had the MyItemData object which had source code like


private Image icon16;
private Image icon32;
public static final String PROP_ID = "id";
public static final String PROP_NAME = "displayName";
public static final String PROP_COMMENT = "comment";
public static final String PROP_ICON16 = "icon16";
public static final String PROP_ICON32 = "icon32";

// ...

public Image getSmallImage() {
return icon16;
}

// ...

private void loadIcons() {
String iconId = props.getProperty(PROP_ICON16);
icon16 = ImageUtilities.loadImage(iconId);
iconId = props.getProperty(PROP_ICON32);
icon32 = ImageUtilities.loadImage(iconId);
}


The idea was now to use the BufferedImage methods getRGB and setRGB to replace the color of the initial 12 png icons (which were drawn in BLACK) dynamically with a color the user has defined as one additional property.

The code to change this depends of what initial color model used in the input PNG. In my case I created the initial icons with Gimp and it was using TYPE_4BYTE_ABGR. Have that in mind when you create the new RGB value to be set for a given pixel.

The new code looks very similar and just a few changes are needed to get the desired result


private BufferedImage icon16;
private BufferedImage icon32;
public static final String PROP_ID = "id";
public static final String PROP_NAME = "displayName";
public static final String PROP_COMMENT = "comment";
public static final String PROP_COLOR = "color";
public static final String PROP_ICON16 = "icon16";
public static final String PROP_ICON32 = "icon32";

// ...

public Image getSmallImage() {
int width = icon16.getWidth();
int height = icon16.getHeight();

for (int x = 0; x < width; x++) {
for (int y = 0; y < height; y++) {
int rgb = icon16.getRGB(x, y);
if (icon16.getRGB(x, y) < 0) {
rgb = some_method_returning_the_RGB_for_a_selected_color;
icon16.setRGB(x, y, rgb);
}
}
}
return icon16;
}

// ...

private void loadIcons() {
String iconId = props.getProperty(PROP_ICON16);
icon16 = (BufferedImage)ImageUtilities.loadImage(iconId);
iconId = props.getProperty(PROP_ICON32);
icon32 = (BufferedImage)ImageUtilities.loadImage(iconId);
}


With respect to the method giving the new RGB value for a given pixel based on one of the Web Colors I simply get the alpha, red, green and blue components (via bit shifting, see for example here for a discussion) and then set the value for Red, Green and Blue depending on the Web color selected in the property. After that set the new RGB value equal to

rgb = (alpha << 24) | (red << 16) | (green << 8) | blue;

Now I can show the icons for the Palette Items in any color the user may select and only need to store one black version of them in the system

Friday, August 21, 2009

NB 6.5 32-bit launcher and 64-bit JVM on Windows XP

After having my RCP app running for a while on Windows XP 32 bit I had to deploy it on a 64 bit XP Windows using a 64 bit Java JVM.

Well, the Windows XP 64-bit machine had both the 32 bit and 64 bit Java 1.6.0_14 JRE installed, but just double clicking on my launcher always picked up the 32 bit JRE.

Now, adding the --jdkhome "C:\Program Files\Java\jre6" (Remember: there are two (2) dashes) to the 32 bit launcher executable, my RCP app launched happy in the 64 bit JVM. Using Help -> About gives this:


So a primitive solution is to add your own little ".bat" file where you add this option to the launcher.

I have not yet tried this on Nb 6.7 where some major rework was done on the launcher code.

Friday, August 14, 2009

Palette, ItemNode <-> DataNode

Following the (always) excellent blogs from Geertjan, I decided to leverage the Palette for some of my selections. See Palette Filter, Listen to Palette, Palette API and 6.0 Part 1, Part 2 and Part 3.

Now, I decided to have my palette instantiate its Items via a Node tree, so that those also could be represented at the same time via the Explorer Tree view. I created Nodes via the FileSystem as described in the "Rich Client Programming" book but initialize the PaletteController with the root Node instead of the root of the FileSytem representing the tree.

All happy. Now, of course I would like the user to be able to Edit the different Palette Items and followed Extend the Palette blog creating MyPalette and a CustomItermAction alla

public Action[] getCustomItemActions(Lookup lookup) {
Node itemNode = (Node)lookup.lookup( Node.class );
if( null != itemNode ) {
return new Action[] { new CustomizeItemAction( itemNode ) };
}
return null;
}

So far so good. The problem started when I tried to get hand on the underlying DataNode representing this Palette Item. In the implementation of my CustomizeItemAction I tried (naively) to cast the itemNode to a DataNode with the very unforgiving error

ClassCastException: Cannot cast org.netbeans.modules.palette.ItemNode to ... DataNode.

What the heck ? Could not even find any JavaDoc for org.netbeans.modules.palette.ItemNode. Well Google is your friend and after locating the source of ItemNode, I found that ItemNode is a FilterNode and hence of course I could not get hand on my DataNode, and the getOriginalNode() method in ItemNode was package protected - hmpf.

Solution: Lookup !

Lookup was very friendly. After adding the code

Collection c = item.lookupAll(Object.class); Iterator i = c.iterator(); while(i.hasNext()) { Object o = i.next(); System.out.println("o "+o); }

to check what is in the Lookup at the time of selection, I could see that the Lookup send to the Action did contain the instance of my DataObject represented by this Node. (Thank you !) Still, - trying to change the code from


public Action[] getCustomItemActions(Lookup lookup) {
Node itemNode = (Node)lookup.lookup( Node.class );
if( null != itemNode ) {
return new Action[] { new CustomizeItemAction( itemNode ) };
}
return null;
}


To

public Action[] getCustomItemActions(Lookup lookup) {
MyDataObject myDataObject = (MyDataObject)lookup.lookup( MyDataObject );
if( null != myDataObject ) {
return new Action[] { new CustomizeItemAction( myDataObject ) };
}
return null;
}

Did give me an annoying error in the Java Editor
inconvertable types
found: org.openide.util.Lookup.lookup
required: com.demo.MyDataObject

?!?! All looked normal - just replaced "Node" with "MyDataObject" ! After some strong coffee - the trivial solution was that my module having the action defined did not include the Datasystems API - and the reason it is triggering it is because the MyDataObject extends MultiDataObject living in the Datasystems API

So - finally, after some confusing hours I have a ItemAction which has hand on the DataObject representing the PaletteItem and can thereby get hand on the underlying FileObject and do whatever is needed.

... by the way .. it turned out to be a good idea to send down the PaletteController together with the Action to allow the code in the Action implementation to perform a refresh() on the Palette.